
Halloween baking is all about the creepy, the cute, and the creative, and these Spooky Cherry Eyeball Pies hit all the right notes. Imagine biting into a flaky, buttery mini pie only to find a sweet cherry “eyeball” staring back at you from a pool of crimson “blood.” This recipe is designed for maximum impact with minimal effort, making it an ideal project for bakers of all skill levels, including those who are kitchen-phobic. Let’s turn a classic dessert into a hauntingly memorable treat that will have everyone screaming for more.
Table of Contents
Ingredients
- 2 sheets refrigerated pie dough
- 1 (21 ounce) can cherry pie filling
- 6 fresh or frozen pitted dark sweet cherries
- 1 large egg
- 1 teaspoon water
- 1 small tube white decorator icing with small round tip
- Red berry sauce or seedless raspberry/strawberry jam, slightly warmed for drizzling
Step-by-step instructions for making the recipe
- Preheat the oven to 375 degrees F (190 degrees C). Grease a 12-cup muffin tin thoroughly to ensure the pies release easily after baking.
- Roll one sheet of pie dough out on a lightly floured work surface. Using a 4-inch round cookie cutter, cut out 12 circles. You may need to re-roll the scraps to get all 12.
- Gently press each dough circle into a prepared muffin cup, forming a mini pie shell. Use your fingers to ensure the dough is pressed neatly against the sides. Pierce the bottom of each crust 3-4 times with a fork to prevent puffing during baking.
- Pre-bake the empty shells in the preheated oven until they are set and lightly golden, about 10 minutes. Remove the muffin tin from the oven and let the shells cool in the pan for about 5 minutes. This step helps create a crispier crust.
- Spoon the cherry pie filling evenly into the partially baked shells, filling them almost to the top.
- Roll out the second sheet of pie dough. Using a 3-inch round cookie cutter, cut out 12 circles for the pie tops. Place one circle on top of the filling in each muffin cup.
- Crimp the edges of the top and bottom dough layers together with your fingers or a fork, ensuring the filling is fully enclosed.
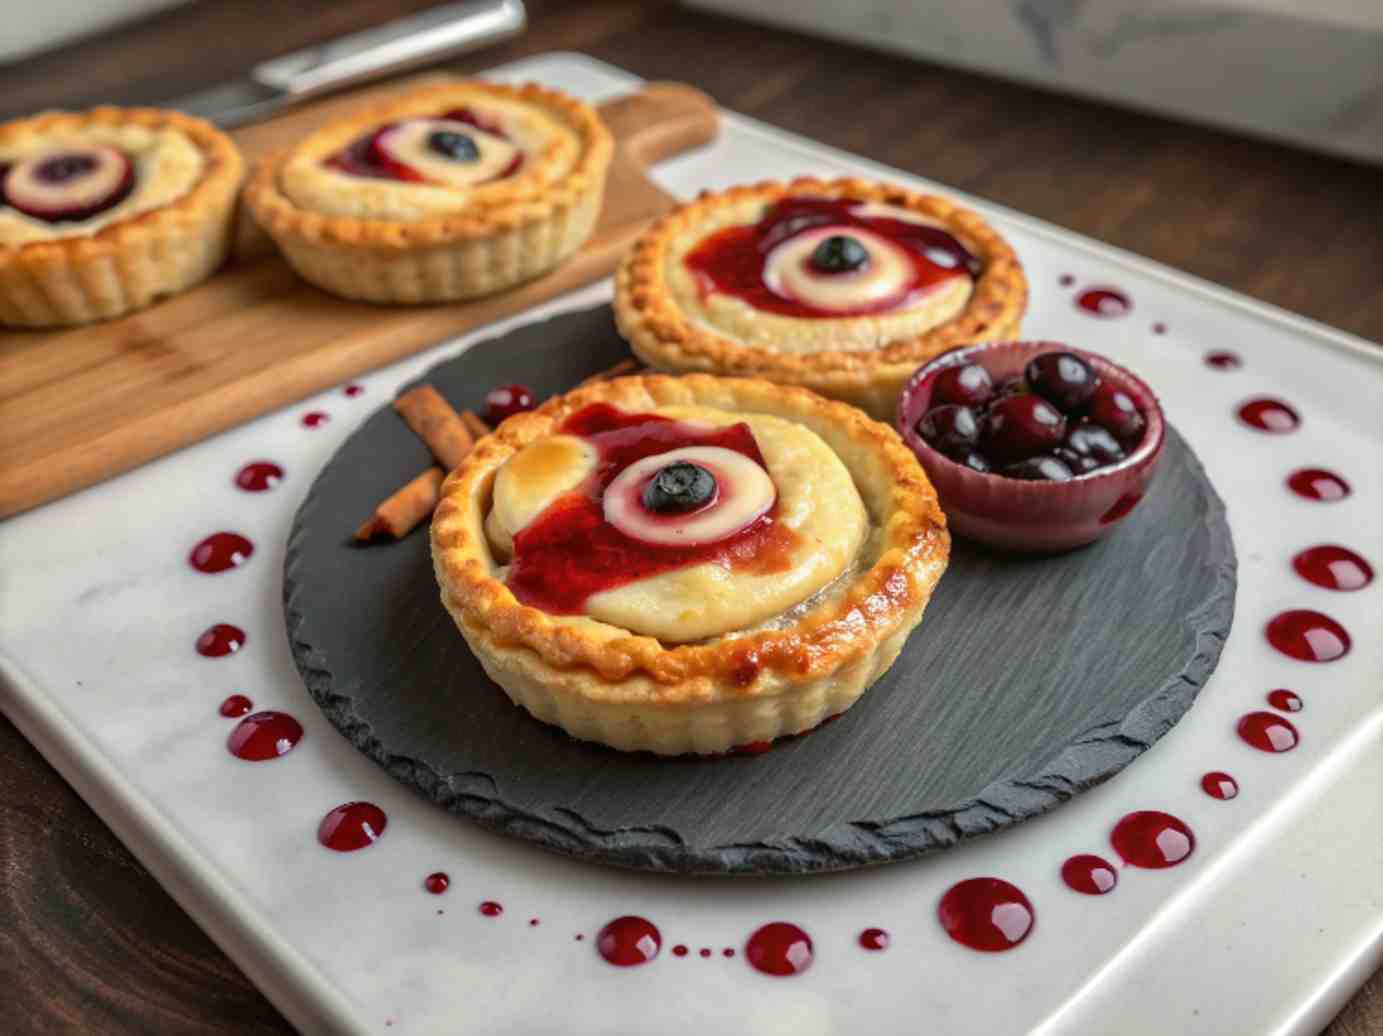
- Slice the 6 dark sweet cherries in half. Place one cherry half, cut-side down, directly in the center of each mini pie. This will form the “eyeball.”
- Using the remaining dough scraps, cut out one large and one small crescent shape for the “eyelids” for each pie. Gently place these dough eyelids onto each cherry, pressing down lightly to secure them. Be sure to leave about half of the cherry peeking out to create the iris and pupil effect.
- Whisk the egg and 1 teaspoon of water together in a small bowl to create an egg wash. Using a pastry brush, lightly brush the entire pastry top, including the dough eyelids, with the egg wash. This will give the pies a beautiful, golden-brown shine.
- Bake the mini pies in the preheated oven until the crust is a deep golden brown and the filling is bubbly, about 15 to 20 minutes.
- Remove the pies from the oven and allow them to cool in the muffin tin for at least 10 minutes. Then, carefully transfer them to a wire rack to cool completely before decorating.
- Just before serving, use the white decorator icing to pipe a tiny dot on each cherry to create a “glint” in the eye. Then, pipe a thin line of white icing along the lower edge of each cherry to make the eye look more realistic.
- To serve, drizzle a small pool of the warmed red berry sauce or jam onto individual plates. Place one fully decorated eyeball pie in the center of each plate for a terrifyingly tasty presentation.
Spooky Cherry Eyeball Pies
Ingredients
Equipment
Method
- Preheat the oven to 375 degrees F (190 degrees C). Grease a 12-cup muffin tin.
- Roll pie dough out on a work surface. Cut out 12 circles with a 4-inch round cookie cutter.2 sheets refrigerated pie dough
- Gently press each circle into the cup of a standard muffin tin to form a mini pie shell. Pierce the bottom of each crust a few times with a fork.
- Pre-bake empty shells in the preheated oven until lightly golden, about 10 minutes. Remove muffin tin from the oven and allow for the shells to cool for about 5 minutes.
- Spoon cherry pie filling evenly into the shells.1 can cherry pie filling
- Roll out remaining pie dough and cut out 12 circles with a 3-inch round cookie cutter. Place on top of the pie filling and crimp the edges so filling is fully enclosed.2 sheets refrigerated pie dough
- Slice dark cherries in half. Place one cherry half, cut-side down, in the center of each mini pie.6 fresh or frozen pitted dark sweet cherries
- Cut out one large and one small crescent shape for the ‘eyelids’ from the dough scraps. Gently place eyelids onto each cherry, pressing down lightly to secure them. Repeat for all 12 ‘eyes’.2 sheets refrigerated pie dough
- Whisk egg and water together in a small bowl and brush pastry top and eye lids with the egg wash using a pastry brush.1 large egg, 1 tsp water
- Bake mini pies in the preheated oven until crust is golden brown and filling is bubbly, 15 to 20 minutes. Remove from the oven and cool pies in the tin for at least 10 minutes. Transfer cherry pies to a wire rack to cool completely.
- Before serving, pipe a tiny dot on each cherry to create a ‘glint’ in the eye with white icing. Pipe a thin line of white icing along the lower edge of each cherry. Drizzle red berry sauce on a plate to look like a pool of ‘blood’. Set eyeball pie in the center of the plate and enjoy your spooky creation!1 small tube white decorator icing, red berry sauce or seedless raspberry/strawberry jam
Notes
FAQ
Can I make these pies ahead of time?
Yes, you can assemble the pies up through step 10 (before baking) and refrigerate them, covered, for up to 24 hours. Brush with the egg wash and bake just before serving. The decorating with icing and sauce is best done right before serving for the freshest look.
What can I use if I don’t have a 4-inch cookie cutter?
A wide-mouth glass or a bowl of a similar size works perfectly as a substitute for a cookie cutter. Just make sure it’s sharp enough to cut through the dough cleanly.
My cherry pie filling is very chunky. Is that okay?
Yes, that’s fine! The chunks of cherry will add to the textured, “gory” look of the eyeball. If you prefer a smoother look, you can give the pie filling a rough chop before spooning it into the shells.
Can I use a different pie filling?
Absolutely! Blueberry pie filling would create striking blue eyes, while apple pie filling could be used for a more zombie-like, veiny effect. Just be sure to use a pitted cherry half or a small, round piece of apple for the center “pupil.”
How should I store leftovers?
Store any leftover pies in an airtight container at room temperature for up to 2 days. The icing may soften over time.